News

Process control valves – making the right choice

Modern process control valves offer a wide range of features and benefits for industries that require precise control over fluids, steam and other gases. With so many control valves on the market, it is important to establish the features that will deliver the most cost-effective design for a particular application. Damien Moran, field segment manager, Hygienic – Pharmaceutical at Bürkert, looks at some of the basic differentiators as well as some recent design developments.

Control valves are used to manage the flow rate of a liquid or a gas and in-turn control the temperature, pressure or liquid level within a process. As such, control valves are defined by the way in which they operate to control flow and include globe valves, angle seat, diaphragm, quarter-turn, knife and needle valves, to name a few. In most cases the valve bodies are made from metal; either brass, forged steel or in hygienic applications 316 stainless steel.

Establishing the parameters

Actuators use an on-board system that measures the position of the valve with varying degrees of accuracy, depending on the application. A contactless, digital encoder can place the valve in any of a thousand positions, making it very accurate, while more rudimentary measurements can be applied to less sensitive designs.

One of the main areas of debate when specifying control valves is determining the size of the valve required.

Quite often process engineers will know the pipe diameter that is used in an application and it is tempting to take that as the defining characteristic for the control valve. Of greater importance are the flow conditions within the system as these will dictate the size of the orifice within the control valve. The pressure either side of the valve and the expected flow rate are essential pieces of information when deciding on the valve design.

Improving efficiency

Inside the valve body, the actuator design is predominantly either a piston or a diaphragm design. The piston design typically offers a smaller, more compact valve which is also lighter and easier to handle than the diaphragm designs. Actuators are usually made from stainless steel or polyphenolsulpide (PPS), which is a chemically resistant plastic. The actuator is topped off by the control head or positioner.

Older, pneumatically operated positioners had a flapper / nozzle arrangement and operated on 3-15 psi, so no matter what the state of the valve, open closed or somewhere in between, the system was always expelling some compressed air to the atmosphere.

Compressed air is an expensive commodity, requiring considerable energy to generate and when a manufacturing line is equipped with multiple process control valves all venting to the atmosphere, this can equate to a considerable waste of energy. It is important then to establish not only the most appropriate valve design, but also a cost-effective solution that takes account of annual running costs.

Modern, digital, electro-pneumatic valves that use micro solenoid valves to control the air in and out of the actuator have introduced significant improvements for operators. This design means that while the valve is fully open, fully closed or in a steady state, it is not consuming any air. This, and many other engineering improvements, have made substantial advances in both economy and precision.

Flexible designs

Valve seats can be interchangeable within a standard valve body, which allows the valve to fit existing pipework and the valve seat to the sized to the application more accurately. In some cases, this can be achieved after the valve has been installed, which would enable a process change to be accommodated without replacing the complete valve assembly.

Selecting the most appropriate seal materials is also an important step to ensure reliable operation; Steam processes would normally use metal-to-metal seals, whereas a process that included a sterilisation stage may require chemically resistant seals.

Having installed a new valve, setting it up is now comparatively easy and much less time-consuming. In-built calibration procedures, such as Bürkert’s X-tune, perform the initial setup procedures automatically, measuring the air required to open and close the valve, the resistance of the piston seals on the valve stem and the response time of the valve itself. Once complete, the valve is ready for normal operation.

Improving safety

Control valves should be specified so that they operate in the 40-85% range so if the valve is commanded to a 10% setting, it can detect that something has potentially gone wrong with the control system and the best course of action is to close the valve completely. If the valve is commanded to a position of 10% or less this can cause very high fluid or gas velocities, which have damaging effects on the system and cause considerable noise and damage to the valve itself.

Modern control functionality can offer a solution that acts as a safety device to prevent damage to the process pipework and components. By building in a fail-safe mechanism, any valve position setting below a pre-set threshold will result in the valve closing completely, preventing damage to the surrounding system.

Control inputs can also include safety circuits to ensure safe operating conditions within the process equipment. For example, if an access panel on a vessel containing steam is opened, an interlock switch will open and the valve controlling the steam supply to the vessel can be closed automatically helping to mitigate any risks.

Improving reliability

Many process control environments offer less than ideal conditions for long-term reliability. Moisture-laden atmospheres, corrosive chemicals and regular wash-downs all have the capacity to shorten the service life of a process control valve. One of the potential weaknesses of the actuator is the spring chamber where atmospheric air is drawn in each time the valve operates.

One solution is to use clean, instrument air to replenish the spring chamber, preventing any contamination from entering. This offers a defence against the ingress of airborne contaminants by diverting a small amount of clean control air into the control head, maintaining a slight positive pressure, thus achieving a simple, innovative solution. This prevents corrosion of the internal elements and can make a significant improvement to reliability and longevity in certain operating conditions.

Ultimately, choosing the most appropriate process control valve can be a complex task that is often best achieved with the assistance of expert knowledge. Working directly with manufacturers or knowledgeable distributors enables process control systems to be optimised for long-term reliability as well as precision and efficiency.

Rubens masterpiece gets Hanwell protection

Hanwell Solutions’ unique environmental monitoring system has been installed around the famous Rubens’ ceiling paintings in London’s historic Banqueting House in Whitehall for some years, but was recently updated to provide several significant improvements.

Multi-award-winning Hanwell is the UK’s leading manufacturer of wireless environmental monitoring equipment, its instruments playing a major part in protecting famous heritage and historic landmarks, including the only three surviving in-situ ceiling canvas paintings by Flemish artist, Sir Peter Paul Rubens.

One of the original challenges facing the team from Historic Royal Palaces was being able to gain accurate temperature and humidity data near to the surfaces of the canvases.

Hanwell originally installed traditional temperature and humidity sensors, which provided the much-needed data required by the conservators to assist in establishing the condition of the canvases. An inherent problem with relative humidity sensors is the need for regular calibration in order to continually provide accurate and reliable data. Due to placement of most sensors, extensive scaffolding is required which is extremely costly and disruptive, therefore regular sensor calibration to ensure completely reliable results was not possible.

The next challenge was how the T/RH of the ceiling could be reliably monitored over a long period.

Due to Hanwell’s ability to develop bespoke solutions an innovative solution was developed using existing high stability temperature sensors. The stability of these sensors – the fact that they rarely “drift” – has been proven in field service over 20 years.

Using these sensors, and one single Temperature and Relative Humidity (T/RH) sensor, Hanwell wrote a custom algorithm to calculate the Relative Humidity at the ceiling based on the temperature measured there, eliminating the need for inaccessible sensors to be calibrated. Two groups of sensors were installed, one linked to the space above and one linked to the space below the ceiling. Each group consists of several temperature-only sensors and one T/RH sensor. The RH levels at the ceiling are calculated and converted to signals from virtual T/RH sensors which are then displayed in the Hanwell software for monitoring and reporting purposes. The only sensor requiring calibration in each group is the single T/RH sensor which is easily accessible.

The original software from Hanwell was generally a standalone system making connection to other buildings very difficult. As part of the same project, the decision to upgrade Hanwell’s software from RadioLog to a centralised web-enabled system was an easy one for HRP as it immediately reduced the amount of time and resources needed to gather the environmental data, by providing the ability to add all other properties under Historic Royal Palaces control into a single software platform. Centralising the software reduced maintenance and costs as the software now only exists in one place. The staff can now log on via a web-browser from anywhere to view their data.

This has resulted in aiding the conservation team to preserve this unique artwork for years to come, avoiding costly regular scaffolding requirements

Following the success of the system upgrade, the conservation team in Whitehall is now able to easily monitor and manage the conditions around Rubens’ Ceiling because they can interpret, share and react to critical environmental changes more swiftly.  The system can instantly provide alerts via email, SMS and mobile app.

Hanwell Business Development Executive Jason Todd explained: “The series of three canvas paintings has lived through almost 400 years of alterations, restorations and preservation projects, including its removal and replacement during the Second World War. Having the opportunity to get right up close to the art work, 5 stories high, was incredible. It was fantastic to be a part of this restoration project, whilst supplying a cost effective solution to the organisation to aid in a way no other competitor could.”

Stable environmental conditions are vital for art collections to help prevent damage to paintings, drawings, prints, mosaics, sculptures and buildings. The accuracy and flexibility of environmental management provided by Hanwell potentially protects heritage sites from damage to irreplaceable historical and cultural items by instantly warning of compromised conditions.

Hanwell’s highly innovative environmental monitoring platforms provide maximum flexibility and enhanced control of data and events from anywhere in the world via cloud or server-based configuration. Interactive graphs, tables and plan views enable users to easily analyse data in multiple ways, and user access levels can be managed through customisable groups.

Chell begins new era as part of SDI Group

Norfolk-based Chell Instruments has been bought by the SDI Group of scientific and technology product manufacturers.

SDI Group (formally Scientific Digital Imaging) own more than fifteen companies and brands which design and manufacture products for use in imaging, sensing and control applications.

Established in the 1970’s, Chell’s purchase by the SDI Group marks an exciting new era for specialists in the design, manufacture and calibration of pressure, vacuum and gas flow measurement instruments and systems.

“This is an exciting time for Chell Instruments.” says Nick Broadly, Chell’s Managing Director since 2001. “SDI as an owner has a good understanding of the way Chell exploits its niche markets and how to grow them further. We look forward to working with SDI and taking Chell forward.”

The innovative company have recently experienced record results as its growing product range proves more popular than ever amongst international customers in sectors including aerospace, vehicle aerodynamics and power generation.

Chell’s new parent, SDI Group, continues to grow through its own technology advancements and the strategic acquisition of complimentary companies within its sector.

“Chell Instruments is another step in our group growth strategy,” said Ken Ford, chairman of SDI. “It is a complementary fit providing potential areas for growth. The acquisition is in line with our previously announced strategy of organic and acquisitive growth and is expected to be earnings enhancing in its first full year of ownership.”

Under its new ownership, Chell Instruments are looking forward to a successful 2020 with more new and unique product innovations planned to answer specific customer-needs.

Sensors ensure fast and safe automotive brake cable production

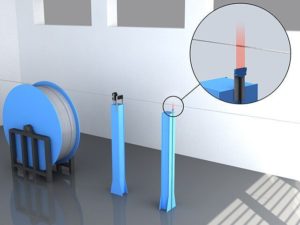
During production of automotive parking-brake cable in a Portuguese factory, strands of steel wire are twisted together, forming a single cable with a nominal diameter of 3mm (0.1in).

The process operates continuously, and twisted cable passes between successive work-stations in an unbroken length. Between operations, the cable is largely unsupported, assuming the form of a suspended catenary.

Occasionally, a manufacturing defect causes the cable to break. In this event, safety is compromised and, unless processing is halted, machine breakdowns occur. A sensor system must detect the presence of the cable as it passes from one operation to the next, interrupting the process if it breaks.

Because the cable is unsupported, its path is unpredictable and its exact position at any time, particularly in the vertical plane, is unknown. The sensor system must detect the presence of the cable reliably at any point within an envelope 90mm (3.5in) high and 20mm (0.75in) wide.

A Contrinex photoelectric sensor system, comprising a DIN-rail-mounted fibre-optic amplifier coupled with a multi-beam diffuse sensing head, provides an optimal solution for this application. With maximum switching frequencies of up to 4000 Hz and sensing distances of up to 150mm (6in), multi-beam fibre-optic sensors are ideal for detecting fast-moving targets. The PBTP construction of the sensing head ensures excellent mechanical protection in the production environment.

The 28mm-wide sensing face of the multi-beam sensor detects targets across its entire width, providing a detection envelope that comfortably accommodates the customer’s 90mm x 20mm requirement. Initial set-up is accomplished by means of a manual teach-in function and integral signal-strength LCD, following which the system operates without manual intervention.

A 2m-long fibre cable allows remote mounting of the fibre-optic amplifier; connection to the customer’s control system is via an industry-standard PNP interface and an integral M8 cable connector, allowing easy removal and replacement when necessary.

The system tolerates high ambient-light conditions and detection of a broken cable is both highly reliable and immediate. If the cable breaks, the system interrupts the process and sounds an alarm, alerting the operator. Downtime arising from broken cables has been eliminated since the system has been operational.

ams launches ultra-sensitive NIR image sensor

ams has introduced the CMOS Global Shutter Sensor (CGSS) Near Infrared (NIR) image sensor CGSS130, complementing ams’ recently announced 3D system. The CGSS130 enables 3D optical sensing applications such as face recognition, payment authentication and more to operate at much lower power than alternative implementations. This means that battery-powered devices can run longer between charges – a key differentiator for OEMs – while supporting more sophisticated sensor functions.

The CGSS130 sensor from ams, which is four times more sensitive to NIR wavelengths than most other image sensor on the market today, reliably detects reflections from very low-power IR emitters in 3D sensing systems. Since the IR emitter consumes most of the power in face recognition and other 3D sensing applications, the use of the CGSS130 sensor will enable manufacturers to extend battery run-time in mobile devices. The sensor also creates the opportunity to implement face recognition in wearable devices and in other products which are powered by a very small battery, or to enable a new range of applications beyond face recognition as the increased sensitivity extends the measurement range for the same power budget.

ams is demonstrating the 1.3Mpixel CGSS130, available for sampling, at the Venetian Tower, Suite 236 / 30th floor at the CES exhibition (Las Vegas, NV, 7-10 January 2020).

Stephane Curral, EVP and GM at ams’ ISS division, says: “Following the announcement of ams’ partnership with SmartSens Technology earlier this year, we are delighted to announce the first 3D Active Stereo Vision (ASV) reference design based on the CGSS130 voltage-based NIR enhanced global shutter image sensor. The 1.3MP stacked BSI sensor offers the highest Quantum Efficiency at 940nm, ideally suited for battery-powered devices. By supplying all main parts of the 3D system (illumination, receiver, SW) ams enables superior system performance with lower costs and a faster time to market for its customers.“

Extending ams’ product portfolio for 3D sensing

Development of the CGSS130 has been accelerated by ams’ partnership with SmartSens Technology, a global supplier of high-performance CMOS image sensors.

ams’ strategic approach is to further broaden its portfolio in all three 3D sensing technologies – Active Stereo Vision (ASV), Time-of-Flight (ToF) and Structured Light (SL) – while accelerating time to market for a more differentiated set of new products. The constituents of the CGSS130 reflect this strategy to cover a wide range of applications such as ASV systems, e-locks, room scanning, Augmented Reality (AR) and Virtual Reality (VR) as well as other applications.

The introduction of NIR image sensors complements ams’ existing offerings for mobile 3D sensing:

  • NIR VCSEL emitters, including the PMSIL range of flood emitters, for example for ToF, and the Belago range of dot pattern projectors for SL or ASV
  • Face detection and face matching software
  • Reference designs which enable faster time-to-market for OEMs with systems offering high performance depth maps for payment, face recognition and AR/VR applications at a highly competitive total system cost

Advanced technology for higher performance

The CGSS130 sensor has a high quantum efficiency at the NIR wavelengths, up to 40% at 940nm, and up to 58% at 850nm. Thanks to the stacked BSI process used to fabricate the CGSS global shutter image sensors, they offer a very small footprint where the footprint of the CGSS130’s die is just 3.8mm x 4.2mm and the GS pixel size is 2.7um.

The sensor produces monochrome images with an effective pixel array of 1080H × 1280V at a maximum frame rate of 120 frames/s. This high frame rate and global shutter operation produce clean images free of blur or other motion artefacts.

The sensor also offers a high dynamic range (HDR) mode in which it achieves dynamic range of more than 100dB. It also implements advanced functions such as external triggering, windowing, and horizontal or vertical mirroring.

Marriage made simple: laser profile sensors enable precise alignment and positioning of vehicle instrument panels

Fully or semi-automatic assembly of instrument panels in the automotive production process require the gripper tool to precisely position the panel in accordance with the vehicle chassis. With each chassis potentially having a different variant or position, knowing where the tool is in relation to the chassis allows for smooth marriage of the two parts. Due to their compact design, for easy installation on a robot or manipulator and their integrated 2D/3D profile measurement capabilities, non-contact laser profile sensors from Micro-Epsilon are used for this task.

During assembly, the gripper docks with the instrument panel module on the vehicle chassis. When the module is successfully docked on both sides, laser profile scanners from Micro-Epsilon measure the current position of the module in the Y- and Z-axes against the vehicle coordinate system. In order to determine the measurement values, reference points on the instrument panel skin are used, which are defined via specific intersections. Subsequently, these measured values are compared with predefined set point values in order to determine whether the instrument panel has been positioned correctly.

When the values are calculated, an actuator is activated, which correctly aligns the instrument panel based on the reference points. In the next step, the instrument panel is fastened onto the car body. As the laser scanners perform the measurement and positioning tasks, each instrument panel module can be individually adapted to the respective car body. A laser profile scanner from Micro-Epsilon then evaluates the complete profile and transmits these measurement values via Ethernet to the control system. This enables the actuators to change the axis positions on the gripper in order to assemble the instrument panel in the ideal position in the car body. After the module is fixed in place, the sensor then determines the installation position of the instrument panel, which serves as proof of quality for each vehicle. For the entire process, including the fitting of the instrument panel, a cycle time of less than one minute is required. Measuring independent of surface conditions, the laser profile sensors provide reliable measurement values regardless of whether bright or dark paints are used, different gloss levels, variable surface structures and in changing ambient light conditions.

Researchers create nanoscale sensors to better see how high pressure affects materials

Researchers have developed new nanoscale technology to image and measure more of the stresses and strains on materials under high pressures.

Krishan Kumar Pandey, Valery Levitas and Mehdi Kamrani, left to right, study materials subject to high pressures in Levitas’ Iowa State University laboratory.

As the researchers reported in the journal Science, that matters because, “Pressure alters the physical, chemical and electronic properties of matter.”

Understanding those changes could lead to new materials or new phases of matter for use in all kinds of technologies and applications, said Valery Levitas, a paper co-author and Anson Marston Distinguished Professor in Engineering at Iowa State University, the Vance Coffman Faculty Chair and professor in aerospace engineering.

Levitas – whose lab specializes in experimental testing and computational modeling of high-pressure sciences – said the new sensing technology could also advance high-pressure studies in chemistry, mechanics, geology and planetary science.

Development and demonstration of the technology is described in a paper, “Imaging stress and magnetism at high pressures using a nanoscale quantum sensor,” just published by Science. The lead author is Norman Yao, an assistant professor of physics at the University of California, Berkeley. Iowa State’s Mehdi Kamrani, a doctoral student in aerospace engineering, is also a co-author.

The paper describes how the researchers fit a series of nanoscale sensors – they call them nitrogen-vacancy color centers – into diamonds used to exert high pressures on tiny material samples. Typically, those “diamond anvil” experiments with materials squeezed between two diamonds have allowed researchers to measure pressure and changes in volume.

The new system allows researchers to image, measure and calculate six different stresses – a much more comprehensive and realistic measure of the effects of high pressure on materials. The new tests also allow researchers to measure changes in a material’s magnetism.

“This has been one of the key problems in high-pressure science,” Levitas said. “We need to measure all six of these stresses across a diamond and sample. But it’s hard to measure all of them under high pressure.”

Levitas’ lab has done unique experiments by putting materials under high pressure and then giving them a twist, allowing researchers to drastically reduce phase transformation pressure and search for new phases of matter, which may have technological applications.

The lab also does multiscale computer modeling for high-pressure diamond anvil experiments – Levitas says it’s the only lab in the world doing such simulations. He said that experience with high-pressure simulations was why he was invited to collaborate with Yao’s sensor project. Simulations made it possible to reconstruct fields of all six stresses in the entire diamond anvil, where they could not be measured, as well as verify experimental results. Levitas plans to use this sensor in his lab.

The sensor enables “pursuit of two complementary objectives in high-pressure science: understanding the strength and failure of materials under pressure (e.g., the brittle-ductile transition) and discovering and characterizing exotic phases of matter (e.g., pressure-stabilized high-temperature superconductors),” the researchers wrote in their paper.

The nitrogen-vacancy sensing technology described in the paper has also been used to measure other material properties – for example, electric and thermal characteristics. The researchers wrote it “can now straightforwardly be extended to high-pressure environments, opening up a large range of experiments for quantitatively characterizing materials at such extreme conditions.”

Major overhaul of the BEKA website

BEKA has just completed a major overhaul of beka.co.uk. The old site was well thought of and contained absolutely everything you may need to know about our indicators and displays but improvements are still possible.

The depth and quality of information remains the same but beka.co.uk now responds to display in a format relative to the device being used plus behind the page improvements have also been made.

Please take a look and send us your feedback to sales@beka.co.uk, or call +44 (0) 1462 438301

Yokogawa releases Exaquantum R3.20 plant information management system

Yokogawa has announced the release of Exaquantum R3.20, an enhanced version of its plant information management system (PIMS) software package in the OpreX Asset Operations and Optimisation family. Exaquantum supports the digital transformation initiatives of customers in the process industries by gathering large volumes of plant data and transforming it into usable, high-value business information. Exaquantum R3.20 comes with extended connectivity to OPC Unified Architecture (OPC UA) and enables more efficient and secure communication with business systems and data analysis tools to help achieve operational improvements.

Development Background

To implement digital transformation journeys and drive improvement initiatives requires improved visibility into operations and the removal of information silos across an enterprise. In the process industries, this means plants are becoming more sophisticated with sensors and smart devices generating growing volumes of process data that needs to be accumulated, integrated, and structured for analysis and decision-making on plant information management systems (PIMS). Increasingly, this large volume of data is also required by other business systems and tools, so it needs to be efficiently exported from the PIMS in a standardised format. In some situations, process data is used not just by plant operators but also other functions across the organisation such as management, research, logistics, and procurement, so the data must be usable in a PC environment that follows the corporate IT regulations. Extending the usability of standardised plant data to a wider audience opens up opportunities to more easily extract value from this information and break down any silos that may exist.

Enhancements

1.           Extended support for OPC UA

A growing number of industrial automation systems and devices are being designed to take advantage of the secure, platform-independent OPC UA* communication architecture. To capitalise on the increasing amounts of data available from these systems, Exaquantum R3.20 has extended its support for OPC UA. With this expanded connectivity, Exaquantum is able to capture data securely from multiple layers of assets such as sensors, complex systems, and business applications.

* OPC Unified Architecture (UA): OPC is the interoperability standard for the secure and reliable exchange of data in the industrial automation space and in other industries. OPC UA is a hardware and OS independent communication standard with high security and extensibility that provides a base for Industry 4.0.

2.           Improved support for data analysis requirements

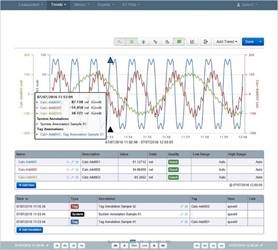
The vast amounts of captured production data can be studied and analysed with the Exaquantum built-in tools and applications. Exaquantum is also an efficient and secure interface for supplying data to the latest business intelligence and analysis platforms that can be used to execute operational improvement cycles and enhance quality. To assist with the accelerated demands in data analysis and the increase in data volume, Exaquantum R3.20 includes improved client functionality of the Exaquantum Excel Add-In that allows the import of data sets around 16 times larger than previously possible for easier analysis within Excel. Also, improved operability when exporting into CSV formatted files enables easier connection to other business systems and tools.

3.           Support of the latest operating systems and IT software

To ensure the PIMS can be operated within customers’ corporate IT environments, Exaquantum R3.20 supports Microsoft Office 365 and Microsoft SQL Server 2014 SP3, while the Exaquantum client function has been enhanced to run on Windows 10 Pro/Enterprise SAC. In addition, to strengthen security, the software is also compatible with Yokogawa’s CENTUM VP R6.07 distributed control system and Exaopc R3.78 OPC interface package.

Major Target Markets

Process industries such as oil and gas, petrochemicals, chemicals, iron and steel, non-ferrous metals, electric power, pulp and paper, foods, pharmaceuticals, and water treatment

Applications

•     Real-time collection of plant process data into databases

•     Calculation of collected data

•     Display of collected data in trend charts and other types of graphics, spreadsheets, etc.

About Exaquantum

Exaquantum is a plant information management system (PIMS) that is used in a wide variety of industries. The large amount of data stored in a control system is an important asset that can be used by management to improve productivity, quality, and safety. Exaquantum acquires, processes, and stores control system data, and provides it to applications in the manufacturing execution system (MES) domain for use in managing and analysing operations. Exaquantum provides an environment in which data can be analysed, not only from the viewpoint of plant operations and management, but also from a business perspective, facilitating the flow of information at field and management levels and making real-time management a reality.

Yokogawa will continue to utilise Exaquantum to create value with its customers and expand its solutions business together with other Yokogawa systems such as CENTUM™ VP and ProSafe™-RS.

New, comprehensive resource to help all learn the basics of calibration

Calibration helps keep your world up, running and safe.

Though most never realise it, thousands of calibrations are quietly conducted every day around the world for your benefit.  When on your next flight or taking medication or passing a nuclear facility, you can expect that the systems and processes used to create and maintain them are calibrated regularly to prevent failure both in production and in on-going use.

Also, calibration fosters or improves scientific discovery, industrial manufacturing, and international trade.

To help you understand calibration and its important role, Fluke Calibration has launched a new webpage on its website that provides a great overview. The comprehensive page covers the questions of who, what, why, when, where and how of calibration at a single location. Providing an introduction to the basics of calibration, the page makes essential reading.