Features

OTT HydroMet invests in UK growth

As the world is seeking new ways to fight climate change and develop mitigation strategies for severe weather, OTT HydroMet’s UK business has invested in two new positions to help meet that need. “Our technologies and data management solutions enable customers to monitor water resources and weather more effectively than ever before,” explains OTT HydroMet’s Robin Guy. “This means that we can play a role in not just monitoring the changing climate, but also helping to create severe weather warning systems that issue timely alerts to protect life and property. We have therefore recruited two new highly qualified and experienced business development managers that will offer customers the highest levels of support as they plan their monitoring and rapid response capability.”

Lewis Taylor

Lewis Taylor will support old and new customers in the south of the UK, and Wendy Strain will cover the north.

Lewis has a first class degree in Mechanical & Manufacturing Engineering from the University of South Wales, and a Post Graduate Certificate in Professional Engineering from Cardiff University. He has worked as a CAPEX and OPEX process improvement engineer on several major water projects, and has 15 years of experience in sales and project management for major industrial water customers.

Wendy has a degree in Applied Chemistry from Liverpool John Moores University, and has 15 years of experience in municipal and industrial water and wastewater treatment, including 8 years in a consulting role; providing technical advice and training on mechanical and chemical water treatment.

Wendy Strain

“We are delighted to welcome these two talented individuals to our UK team,” adds Robin Guy. “The UK is already experiencing more frequent instances of severe weather, and COP26 has highlighted the fact that this situation is likely to worsen in the coming years. “We are therefore determined to help customers ensure that their monitoring networks are better able to detect issues such as intense rainfall, rising water, flooding and severe winds. These issues threaten lives and infrastructure such as highways, railways, buildings, industry and domestic housing, so Lewis and Wendy will be tasked with helping customers take advantage of the latest technologies in remote measurements, communications and data management software.”

Delivering excellence in benzene monitoring instrumentation for the chemical, pharmaceutical and petrochemical industries

Monitoring benzene exposure levels is critical for the health and wellbeing of staff and the public who may encounter this group one carcinogen. While benzene has many useful and practical applications in industries, the risk to health is undeniable and requires exact and precise monitoring to mitigate damage. Having accurate and dedicated monitoring instrumentation specifically for managing the risk of benzene is essential for any business that works with this chemical.

As benzene is both widespread in industrial applications and poses a significant risk to health, there is pressure from public health and industrial safety perspectives on making sure it is managed and monitored properly. The most effective way of minimising exposure to benzene is through appropriate safety and monitoring practices. Using PID (photoionisation detection) instruments from ION Science is an excellent way of protecting against potential hazards.

ION Science has a dedicated range of instruments specifically designed for monitoring benzene. As a compound that poses a range of long- and short-term health risks associated with exposure, having instruments that can monitor wherever staff are working and in areas where there is potential for public or environmental exposure is key.

For protecting individual staff, ION Science offers the Cub TAC (total aromatic compound) 10.0 eV personal benzene gas monitor. This personal monitoring solution is worn within the breathing zone on the person, allowing individual monitoring of exposure levels to be exact. Equipped with audio and visual alarms when exposure goes beyond pre-set levels, the Cub TAC is designed to keep workers safe in all situations. Data can be uploaded for review by the site Occupational Hygienist or Health and Safety Officer, so any exposures that pose a risk can be quickly addressed and dealt with.

The Titan fixed benzene specific gas monitor is a standalone unit that can be fitted around sites, factories, and storage units. This is particularly useful for monitoring

benzene, as one of the highest risk factors in benzene exposure is related to the storage and distribution of petrol and petroleum-based products. Benzene can also be found on sites such as oil refineries and foundries, which are often large and not necessarily always monitored in person. The Titan fixed unit is wall mounted and samples air every minute, providing an accurate readout of benzene air concentrations within just 60 seconds. With a dynamic detection range, the Titan is designed to monitor for benzene at just 0.1 ppm concentration levels, keeping staff as safe as possible when in proximity.

Where portable detection is essential, ION Science offer the Tiger Select portable benzene gas detector. Ideal for use around sites and for checking levels while working, the Tiger Select keeps staff safe as well as monitoring air levels and concentrations for health and safety purposes. With both 15-minute short term exposure limits and 8 hour time weighted averages, the Tiger Select makes it possible to monitor exposure risks at all levels and throughout the day.

What really makes ION Science’s range of benzene specific instruments valuable to the customer is the fast lead times available on the majority of products. ION Science is proud to offer delivery time turnaround of days, not weeks, and in some cases, it may even be possible to have products arriving to customers within 24 hours.

With a global network of suppliers, distributors and offices, ION Science boasts superior supply chains to get products where they need to be. Whether customers have an immediate need, such as a suspected leak or impending legislation change, or a long term commitment to improving environmental and public health, choosing from ION Science’s range of benzene detection instruments means products can be on site in some of the fastest lead times available.

New PT100 Calculator by Fluke Calibration

Fluke Calibration just created a new PT100 Calculator: https://us.flukecal.com/pt100-calculator.

The new online tool will calculate temperature and resistance values from the standard PT100 curves. The calculator will produce a temperature value from an entered resistance or calculate resistance and thermometer sensitivity values from an entered temperature.

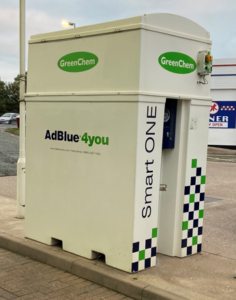
Powelectrics IIoT vendor managed inventory technology helps global AdBlue supplier GreenChem to enhance customer service and improve efficiency

The Task

GreenChem is one of Europe’s largest AdBlue producers and distributors with thousands of contracted customers, supplied from over 40 production facilities around Europe and Brazil. In 2010 they needed a more reliable telemetry solution to measure tank levels and ensure customers did not run out of essential supplies.

The Solution

Powelectrics lloT hardware reports level data to Powelectrics software, held on GreenChem’s own servers, with data exported into their ERP, to assist a range of operational activities. A huge advantage is the ability to remotely configure units to accommodate over 40 tank designs.

The Result

GreenChem delivers exceptional service to thousands of customers, ensuring that trucks, cars, off-road equipment and agricultural machinery can operate efficiently. Logical deliveries minimise fuel costs and environmental impact. On-site installation is easy with remote configuration.

Summary

  • Excellent customer service                      
  • Efficient logistics
  • Reduced fuel costs
  • Environmental impact minimised
  • Simple installation and retrofit                  

“As one of Europe’s largest AdBlue distributors, GreenChem rely upon efficient logistics. Powelectrics’ dependable and robust tank level monitoring solution supports that and helps us deliver exceptional customer service. Powelectrics have been our telemetry partner for over a decade, because the technology is exceptionally well-proven in many countries and we are fully supported technically and commercially,” commented Guy Flochlay, MD, GreenChem Holding BV.
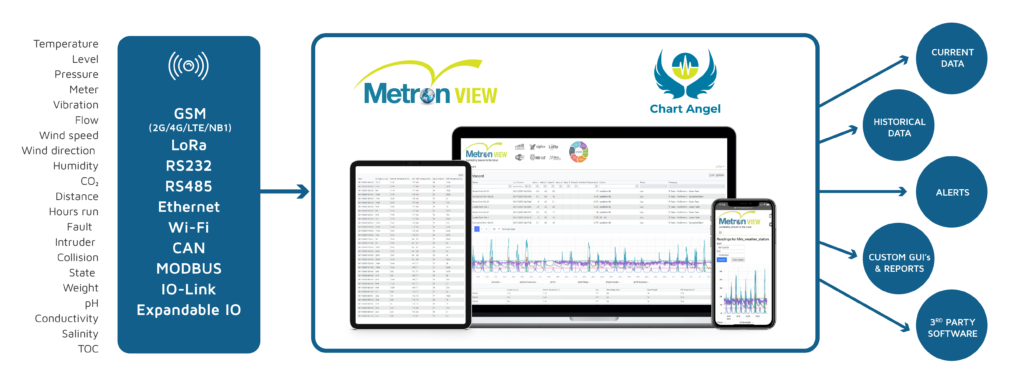
What can Powelectrics do for you?

Please browse the Powelectrics website and get in touch with any tank level monitoring queries you have or vendor managed inventory applications you would like to discuss. Call +44 1827 310 666, email  sales@powelectrics.co.uk or use this contact form.

Signal Group expands range of service contracts

Signal Group (UK), the gas analyser manufacturer, has announced the launch of a new flexible range of service contracts, which enable customers to determine the level of service required. “No two companies are the same,” explains Signal Group Service Manager Roy Kinslow, “so it makes sense for us to offer a tiered-package approach to service contracts.

“Our gas analysers are designed and built for accurate and reliable measurements, but in order to optimise performance, it is necessary to establish a planned maintenance and calibration routine. These new flexible service contracts therefore offer customers the ability to build resilience into their monitoring work; developing plans for unforeseen events and avoiding downtime.”

Each of the different service levels include full technical support via phone and email, but customers are able to choose whether their plan should also include features such as scheduled site visits and emergency call-outs. Each service plan also provides extra discount on spares and consumables.

Vision Engineering and Zeiss collaborate to produce DeepFocus 1: an innovative and competitive Extended Depth of Focus (EDoF) microscope solution

Vision Engineering, British leading designer and manufacturer of high quality non-contact measurement, digital 3D visualisation, and ergonomic inspection technologies, is partnering with Zeiss Industrial Metrology to add an extended depth of focus inspection system to its range of microscopy systems for the first time.

The new DeepFocus 1 system represents a significant collaboration between two of the world’s leading microscope innovators. DeepFocus 1 combines Vision Engineering’s technical and design expertise with Zeiss’ new Visioner 1 long depth of focus digital microscope head.

DeepFocus 1, featuring MALS Technology, delivers live, real-time extended depth of focus imaging with depth of focus up to 100x greater than that of a conventional microscope, which removes the need for time consuming post imaging focus stacking by delivering ‘all-in-focus’ images instantly to a depth of up to 69mm.

Using a micro-mirror array lens system (MALS) enables DeepFocus 1 to generate “virtual” lenses with distinctly different curvatures, thus focus planes. This is achieved by changing the orientation of each individual micro-mirror in an orchestrated way. Re-shaping the curvature of this “virtual” lens at speed enables ultra-fast focusing and real-time all-in focus imaging and documentation.

Three viewing options aid understanding of the subject being inspected.

Extended Depth of Focus (EDoF) view shows the top down view of the subject with all details in focus.

Height-map view displays height data from the subject aiding visualisation of monochromatic samples and understanding of height. Topographic view shows a simulated 3D visualisation of the subject which can be rotated and manipulated.

Both Vision Engineering and Zeiss Industrial Metrology are well known manufacturers in their respective markets and the collaboration will allow both companies to extend their coverage of the global inspection market.  

Paul Newbatt, Vision Engineering’s Group Sales and Marketing Director said “We are delighted to partner with Zeiss in adding DeepFocus 1 to our growing innovative microscopy product range, which further cements our position as a leading microscopy solutions provider in the electronics, and precision engineering sectors”.

High Pressure Water Descaling pilot facility in steel manufacturing makes use of Micro-Epsilon thermal imaging cameras

Tata Steel is using a thermoIMAGER TIM M-1 thermal imaging camera from Micro-Epsilon with a short 1µm wavelength, as well as a thermoIMAGER TIM 400T 1500 long wavelength thermal imaging camera, to measure surface temperature before and after descaling to assess descalability and heat loss based on nozzle pressure/flow and descaling speed.

High Pressure Water (HPW) descaling is the process of removing oxide scale by spraying the hot steel surface under a range of moderate-to-high pressure water using stationary (usually flat jet nozzles) or rotary (rotor descaler) systems. The aim is to ideally remove loose to sticky, primary to tertiary scale under optimum impingement and surface chilling, as well as power-water flow rate consumption, for improving the surface quality of rolled products and minimising work roll wear. Complex solid-fluid thermal-mechanical mechanisms are acting through the scale, scale interface and sub-surface of the steel substrate depending on the descaling process parameters of impact pressure, descaling energy and temperature.

The HPW descaling process is a harsh process where, in particular, measurement of temperature and surface state are difficult to achieve (in view of steam/water, oxide scale debris, confined descaling boxes). Measuring surface losses using IR technology can provide benefits to thermo-mechanical processing for difficult to roll steel grades that are prone, for example, to ductility cracking and/or surface defects, and leads to efficient descaling under robust and energy efficient regime maps.

To study and optimise the descaling process, Tata Steel together with the Steel Metal Institute in South Wales (SAMI) https://www.samiswansea.co.uk/ have revamped a HPW descaling rig to optimise the process. The unit can be used in two modes, static or dynamic, with hot or cold material, from steel to simulation material. Reheated samples are typically blocks of 70x70x100 mm thick placed on a carriage which transports the sample at a fixed speed (up to 4m/s). Following descaling, the carriage stops and the sample is transferred to an Argon-filled container to limit further oxidation.

All signals (height, pressure, flow, temperature, etc) are logged via a Windaq data acquisition system. A sophisticated post-analysis procedure has been put in place to characterise descaling efficiency.

Tata Steel is using a thermoIMAGER TIM M-1 thermal imaging camera from Micro-Epsilon with a short 1µm wavelength, as well as the thermoIMAGER TIM 400 T1500 long wavelength thermal imaging camera, to measure surface temperature before and after descaling. The cameras are mounted above the descaling trolley. By utilising both short and long wavelength detectors and the effect of emissivity on the scale at different wavelengths, Tata Steel can assess descalability and heat loss based on nozzle pressure/flow and descaling speed to develop regime maps for the production process.

The thermoIMAGER TIM M-1 camera was supplied with two exchangeable optics, f=25 and 75mm respectively, which allows flexibility in the field of view and camera location. The 1 µm short wavelength detector is most suited to harsh, steamy environments with reduced emissivity error at high temperatures. Included with the cameras is the powerful TIM Connect software, which allows the cameras to be used in a linescan mode or continuous acquisition from a fixed distance and location. The linescan function is particularly helpful when there is restricted viewing space and allows a complete image to be created of the slab as it passes.

As Didier Farrugia, Scientific Fellow, Rolling Finishing & Measurement Department at Tata Steel RD UK commented: “The thermal measurements made, together with surface state during and post-descaling, coupled with the use of a CCD optical camera post-descaling, has enabled the development of key HPW descaling knowledge for direct implementation and optimisation of plant practices.”

Any optimisation of yield, whether in terms of scale or metal loss during reheating, as well as enhancing surface state and defect minimisation, represents a critical cost-performance benefit for the steel industry, in the region of £1million for ~1% yield gain.

Didier Farrugia concludes: “The cameras have proven to be reliable and easy to use, including the possibility to synchronise the two cameras at two specific locations for full temperature traceability. The cameras are also being used in other specific parts of the steel manufacturing process.”

Off to a flying start

By Emma Ryde – Rittal UK’s Product Manager for Enclosure Systems

Can enclosures be machined and fitted out even faster? How the AX compact enclosure from Rittal speeds things up.

Meurer-etechnik is looking to the new AX compact enclosure from Rittal to improve its production efficiency. How does the new model differ from its predecessor, the AE? A day spent with enclosure production staff reveals all.

A new working day dawns at Murer-etechnik in Germany’s Westerwald region. In the incoming goods section, a young man wearing a black T-shirt with the company logo on the front and the sleeve is taking delivery of a pallet with eight AX compact enclosures from Rittal. Production Manager Steven Lauer is already waiting for their arrival. In just a week’s time, the UL-compliant enclosures are set to be delivered to a special-purpose machinery manufacturer based in the Cologne area. Lauer, can’t wait to see how the new AX enclosures differ from the predecessor model, the AE.

Let’s get started,” he says. Lauer has assigned the task of fitting out the AX enclosures to three of the plant electricians. One of them is already clamping the first enclosure door into the Perforex CNC machining centre. The mounting plates are next. Progress is rapid, because the doors and mounting plates are simply added to the delivery package and staff don’t have the hassle of first detaching them from the enclosure, as is normally the case. Using the digital twin’s manufacturing data from EPLAN Pro Panel, the machine cuts all the necessary holes in double-quick time. “That part is the most fun,” says Lauer, who is standing casually at the machine’s operator terminal.

“There are hardly any questions to deal with and you can see the results straight away,” he adds. t’s now time for pre-assembly, configuration and wiring. A fully automatic wire processing machine has already produced the necessary cable harnesses – also using data from the design engineering department. In this way, Meurer-etechnik is gradually implementing “enclosure manufacturing 4.0”.

Lauer indicates an area in the rear part of the light-filled factory building to three members of staff, who lift the compact enclosures onto small metal trestles. Next to each of the plant electricians is a trolley with tools and a number of boxes containing electronic components. The enclosures are now lying on their backs with the doors fitted. Beside them are the mounting plates, to which the men next attach the mounting rails and cable ducts. Contactors, terminals, inverters and similar components are then installed.

During this configuration process, the electricians regularly consult their tablets to compare their work with the 3D model. Next comes the wiring. Last but not least, the fully wired mounting plate is fitted into the enclosures.

Lauer has been with Meurer-etechnik for ten years. Back when he was an apprentice, he still had to learn how to position each hole manually. “The technology has come a long way since then,” he says before asking his colleagues the following question: “So, what’s different about the AX?” The answer: “It feels like there’s more room on the gland plate.” And there is indeed 30 per cent more space for inserting cables. “That’s a huge advantage,” insists Lauer, because digitalisation is continuously increasing the number of components in the enclosure and thus also the number of cables that need to be routed inside via the gland plate.

He also takes a closer look at the interior wall of the compact enclosure. “There always used to be problems with the interior fit-out, because there weren’t enough options for fitting the depth stays. That has now changed,” he notes. Being able to install the rails at a variety of heights makes the process of designing the levels more flexible. Lauer points to a grey box on one of the trolleys. There are now only three cable harnesses left in it. “Once the box with the cables starts looking empty, I know we’re on the finishing straight,” he says.

There were no errors during testing, and the enclosures for the special-purpose machinery manufacturer were even ready half a day ahead of schedule. “You’re happy if, when you get to the end of the day, there’s no danger of failing to meet the delivery deadline and the quality is as it should be,” says a delighted Lauer.


Showcasing the value of measurement at The National Manufacturing and Supply Chain Conference Ireland

To continue providing Irish manufacturers with local support, metrology provider The Sempre Group, is attending the National Manufacturing & Supply Chain Conference and Exhibition taking place at RDS Simmonscourt, Dublin, on November 23 and 24, 2021. From stand KO6 The Sempre Group will exhibit a range of metrology equipment and consult the Irish market on how integrating metrology into production can improve productivity and ensure compliance. Register for the event here.

This year’s exhibition will mark the first physical event that The Sempre Group will attend in Ireland since opening its first Irish office in Dublin in 2021. At the 180 square metre office, Ireland-based commercial manager, Jason McGlynn and service and application engineer, Paul Cullen, provide local support to customers. The showroom houses a range of metrology equipment from a broad supplier base and also acts as a training centre for Irish manufacturers who require more detailed system knowledge.

At the exhibition, visitors will be able to see how Optical CMMs, such as the Micro-Vu and shaft measurement systems like the Opticline help improve repeatability and accuracy for industries that require high volume, compliant and quality parts, such as medical and aerospace. The Arkite Human Interface Mate, an optical projection system that guides operators with augmented reality (AR) instructions. The Gelsight 3D topography measurement system, a handheld tool that accurately measures surface roughness and defects, will also be on the stand.

To  help manufacturers develop a centralised data system, simplify reporting and compliance and improve productivity The Sempre Group also offers a range of quality management software solutions. High QA Inspection Manager automatically extracts geometric dimensioning and tolerancing (GD&T) data from a model, identifies critical dimensions and auto-populates reports. Manufacturers can also use Prolink software to assess the collated data and automated reports, which helps them to make more informed decisions.

“Attending more events in Ireland enables us to listen to our potential and existing customers in that area to better understand their metrology needs,” explained Jason McGlynn. “Irish manufacturers, particularly in medical and aerospace applications, which want to improve data collection, quality compliance and productivity can visit our stand to see how our equipment, experts and local facility can support their individual needs.

“For example, at the event we’ll have one of our bespoke rotary fixtures. Manufacturers can use these fixtures to streamline the metrology process, hold components steady and remove thousands of manual interventions, reducing costs and time required for measurement.”

To find out more about The Sempre Group’s medical applications before the event, read our latest medical white paper https://www.TheSempreGroup.com/metrology-in-medical-whitepaper.

Multi-position A-coding facilitates flexible, fault-free use

Two-piece M12 panel mount connectors from binder, equipped with square-flange housings and multi-position, lockable A-coding, simplify secure sensor/actuator connections in factory automation and robotics.

binder, a leading supplier of industrial circular connectors, offers various A-coded M12 connectors as part of its 763 product series, which are equipped with a square-flange housing for assembly. As a special feature, the multi-position A-coding supports variable cable installation. Also advantageous for flexible use: flange housing and contact carrier can be processed separately.

Background: the A-coding

Industrial-grade, standardised M12 circular connectors with A-coding according to DIN EN 61076-2-101 are a well-established component of sensor and actuator systems in typical factory automation and robotics applications. Their coding, which serves to avoid mismating, ensures precise assignment of the pin and socket contacts in the process: A-coding generally stands for applications in signal transmission with DC voltage over 3 to 12 pins. The principle of partial assignment of the contacts ensures the plug-in compatibility of product variants with different but lower pin counts. Multi-position coding is advantageous, for example, if the installation has to be carried out at different angles due to the mounting conditions. At the field level of automation, both inside and outside the control cabinet, A-coded M12 signal connectors support efficient, cost-effective sensor/actuator communication in particular.

Two-piece design simplifies the application                        

The square-flange variants of the 763 series generally consist of two parts: the metal flange housing and a contact carrier. The latter is equipped with a lockable coding nose that can be rotated in 45° increments. The two-part design supports user-friendly, safe assembly in practice.

Change of size made easy

The 763 series includes M12 A signal connectors equipped with 4, 5 and 8 pins as well as single wires or solder contacts. The single-wire version has a square housing 20 mm or 26 mm wide. In the variant with solder contacts, it measures 20 mm. The 26-mm square housing of the M12 single-wire version has the same drilling scheme as that of the M16 form factor. This allows users to switch between the design sizes without having to adapt existing housings, for example of field devices such as sensor/actuator boxes.

Technical product details

The rectangular-flange M12 connectors with multi-position, lockable A-coding are specified for a maximum wire gauge of 0.25 mm2 (AWG 24). In all 4-pin and 5-pin versions, the rated currents reach 4 A (3 A UL), 2 A (1,5 A UL) with 8. The rated voltages are 250 V (4-pin), 60 V (5-pin) and 30 V (8-pin). The corresponding rated impulse voltages are specified as 2500 V, 1500 V and 800 V, respectively. The connectors meet the density requirements – combined with suitable sealing but without a defined tightening torque – in accordance with protection degree IP69. They are designed for operating temperatures from -40 °C to +85 °C.